
We have a guest post to share with you today from our friends Miles & Leigh at Fiori Floral Design :
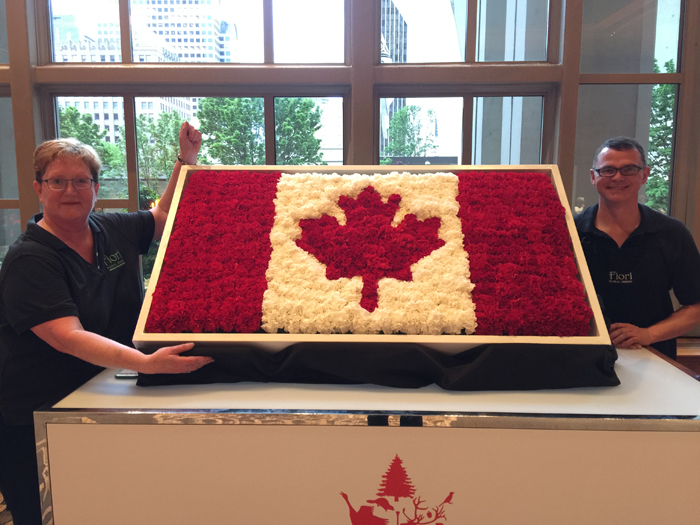
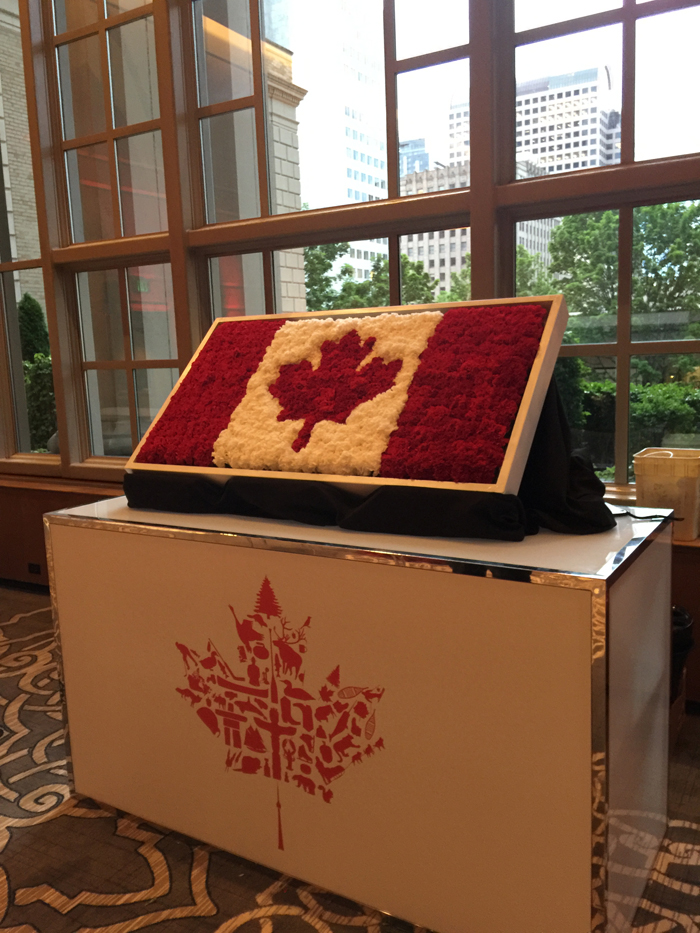
Our client asked us to create something dramatic for an event at the Fairmont Olympic Hotel. They wanted it to be something that guests to the event would enjoy watching be created and that guests would want to take pictures next to. Dynamic was the specific word that was used to describe the effect that she was looking for.
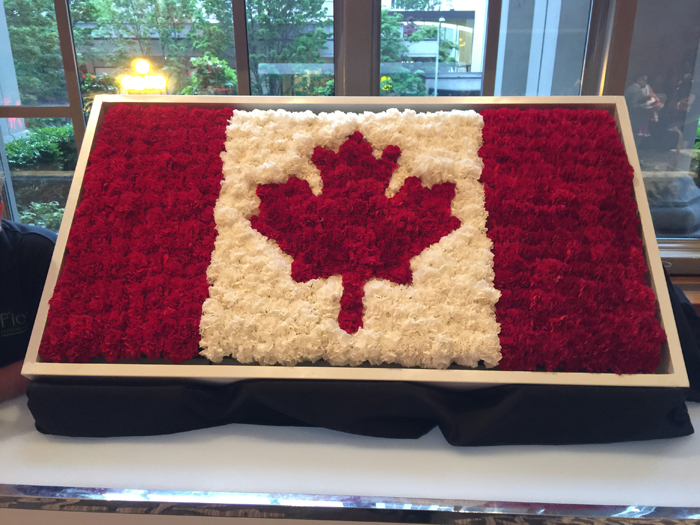
The event was being hosted by the Canadian government to promote Canadian tourism and Canada as a place to do business. The color theme was red and white, reflecting the Canadian flag and the symbol was a in red and white made out of dozens of small graphics representing aspects of Canadian culture. Immediately a Canadian flag flower wall came to mind as something that would be fun to watch being created, impressive if made large enough, easy enough to create in two hours with guests watching and fit the red and white color theme of the event.
The event was in a little over two weeks so we jumped into action to learn how to make a flower wall and what it would cost so we could respond with a proposal. This was the first time that my team had created one so everything was new to us. There is some information available on how to make one, but it is limited. That meant that calculating how many flowers it would take to create it would have to be a best guess, with extra purchased just in case our estimate was off.
Determining the Size
Our first consideration was how big we could make it with our given budget because, like most events, the event planner had a maximum that she could spend. The size would determine how many hard goods and how many flowers it would take to create it, which determined how much it would cost.
First thing we needed to learn are what are the proportions for the Canadian flag? The Canadian flag is a rectangle that is twice as wide as it is high and consists of two vertical stripes of red with a field of white in the middle that has a maple leaf in the center. The red stripes are each one-quarter of the length and the field of white is a perfect square. This ratio was very important in determining the overall size.
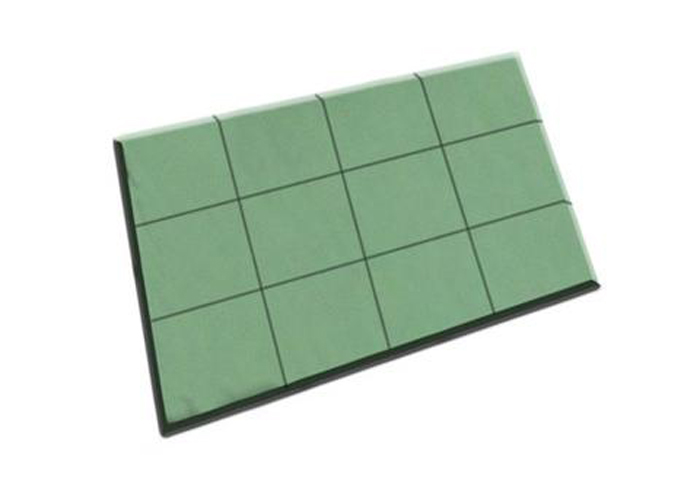
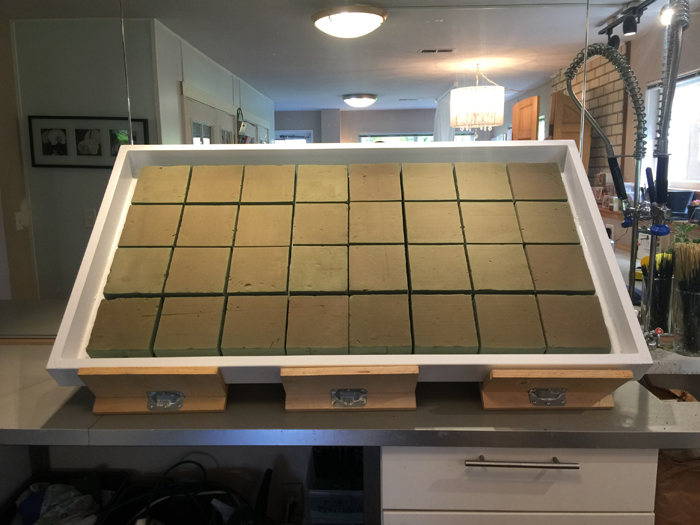
Oasis floral foam tiles seemed to be the most efficient material to use for construction. The tiles come in sheets that are 18 inches by 24 inches. They have 18 tiles squares approximately one inch thick in three rows of 4 tiles. The tile squares are attached to a stiff corrugate plastic that is similar to cardboard and is lightweight and water resistant. Laying the floral foam out this way allows the sheets to be easily cut in six inch increments, although you could also cut through the floral foam if you need them to be a different dimension.
If we were to make the Canadian flag the height of one panel of Oasis (18 inches) the final dimensions would be 18 inches by 36 inches for it to be twice as wide as it is high. That hardly seemed impressive enough for our client. We knew we could easily increase in six inch increments by cutting the floral foam sheets so we added six inches to the height and recalculated. This resulted in a flag that would be 24 inches tall by 48 inches wide. That was more like it.
We had to consider as we determined the dimensions that each increase of six inches would increase the number of flowers needed as well as the number of tile sheets that would need to be purchased. The floral foam tile sheets are not inexpensive and the cost for additional sheets would add up quickly. Keeping it at 3 sheets seemed optimal in order to keep the price down.
Here is why: increasing from 18 inches by 36 inches to 24 inches by 48 inches would require adding only one floral form tile sheet but drastically increased the area that needed to be covered with flowers. The smaller version would only require covering 4.5 square feet of surface area (1.5 feet x 3 feet) with flowers. Adding just 6 inches to the height increase the surface area to 8 square feet (2 feet x 4 feet); or 77.7% larger. That translates into 77% more flowers! If we had added two more 6 inch segment of floral foam tile that would have resulted in a flag that was 2.5 feet tall and 5 feet long with a surface area of 12.5 square feet (2.5 feet x 5 feet); an increase of 178% in surface area. It would also require using four tile sheets instead of three adding greatly to the cost.
The Shadow box
So two feet tall by four feet wide it would be! Next we needed to determine what to affix the floral foam tiles to so they would stay in place. We needed a surface area that would be smooth to allow the panels to be easily attached (the mechanics for attaching the tiles will be explained later). It also needed to be rigid enough not to flex when being carried. Medium Density Fiberboard (MDF) seemed like the perfect solution. In half-inch thickness it would be sturdy, with a smooth surface, light enough to easily transport and economical. A four foot by eight foot sheet would cost only $20US at the local big box hardware store with the added bonus that they would cut it to size at no charge.
We decided to add a frame of 1” x 3” wood as well around the edge of the MDF backing. The frame would make the MDF even more rigid, catch any water that might drip and add dimension to the finished flag. It was decided that if we left a gap of one and one-half inches between the edge of the tiles and the edge of the frame to make the finished flag appear larger. 1” x 3” wood was chosen because the tile sheets are an inch thick. We knew that the flowers would stand up a little less than two inches above the foam tiles so three inch lumber would make the flag a little bit recessed into the shadow box and hide the mechanics when the flag is viewed from the sides.
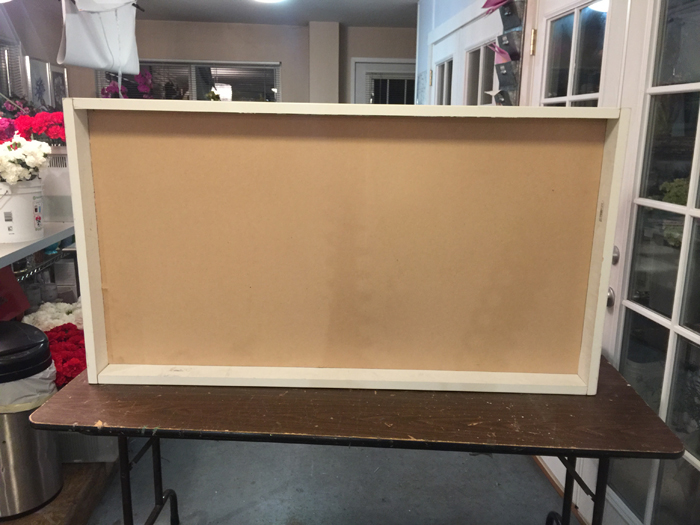
Construction techniques for a shadow box can vary, and I am not a carpenter. I do have enough skills to create this simple structure. The focus is intended to be on the flag and not the shadow box so I used very simple joints and had the wood cut at the big box retailer to the dimensions that I needed. I chose MDF pre-primed casing (molding used to frame doors and windows) to create the frame because it is inexpensive ($22US) and would make painting easier.
The finished shadow box is 29 inches tall and 53 inches wide. By adding the one and one-half inch border between the edge of the tile and the edge of the frame and using one inch wide lumber we increased the total surface area for the flower wall by one-third for even greater visual impact (29 x 53 = 1537 vs 24 x 48 = 1152). My total investment in the shadow box: less than $50US before sales tax including nails, fasteners and paint.
I filled in the joints of the frame and covered the heads of the finishing nails with white caulk before painting as well as putting a bead of caulk all the way around the edge of the interior to catch any water that might drip. A scrap piece of floral foam served as a guide on the inside to make sure that I painted at least one and one-half inch inside the frame all of the way around. The paint is a white semi-gloss that was sprayed on. It took the entire can to cover the frame and border that would be around the floral foam tiles.
Placing the Floral Foam Tiles
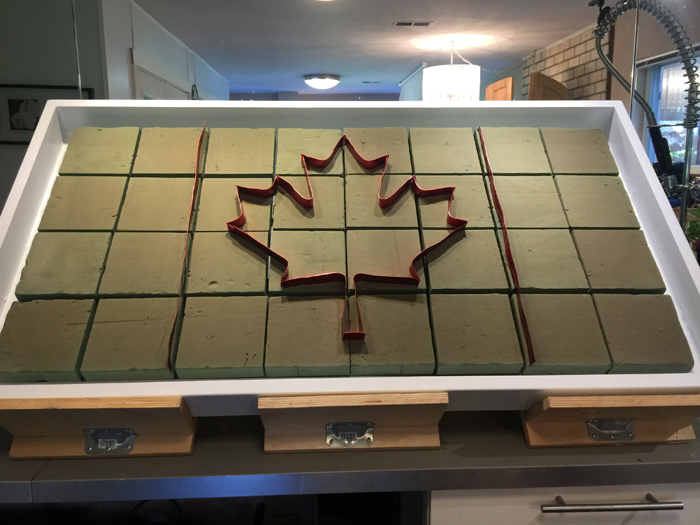
While the paint dried, I cut one of the floral foam tiles into three strips one tile wide. Two whole tile sheets and two strips were used to create the flag with the two whole sheets laid end to end and the two strips beneath them. It also would have been possible to use the tile sheets with the long sides touching by adding two long rows of the third tile sheet next to them.
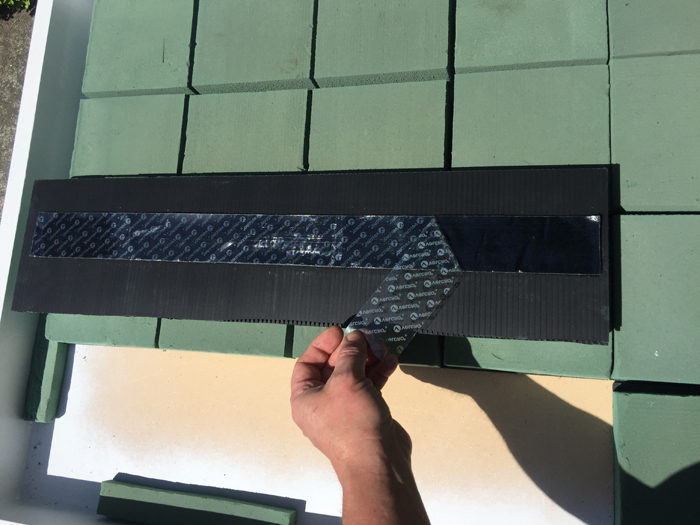
To affix the tile sheets to the shadow box, I used industrial strength hook and loop, also known by the brand name Velcro. The industrial strength variety has the ability to hold up to 10 pounds. Although we ultimately decided not to soak them, the tile sheets weigh 15 pound when fully soaked. Oasis recommends two strips of industrial strength hook and loop per tile sheet. The hook and loop comes in 15 foot rolls that are two inches wide with the hook side and the loop side separated. The roll cost $29US.
I unrolled the two sides and fastened them together then cut them into six strips that were about 22 inches long. The full sheets would get two strips of hook each and loop and the partial sheets just one. It is important to clean off the floral foam dust that accumulates on the back of the tile sheets as the adhesive on the hook and loop works best on a clean dry surface. I peeled off the protective covering over the adhesive and applied the Velcro to the back of the foam whole foam sheets about 6 inches apart. Having both sides attached to the tiles made it easy to make sure that both sides of the Velcro lined up in the shadow box. It doesn’t matter whether you apply the hook side or the loop side to the sheets. The adhesive on the hook and loop is water resistant. If we had planned to soak the tiles instead of just spraying them we would have done that before installing them in the shadow box.
Before affixing the tile sheets to the shadow box I wanted to do a test fitting of them to make sure they were perfectly positioned within the frame. I placed all of the sheets inside the shadow box and cut a spacer out of a scrap piece of floral foam. Using the spacer between the edge of the sheets and the frame I could easily determine if the sheets needed to move up or down or side to side in the frame. Once I was happy with their positioning, I removed the protective covering from the adhesive on the back of the Velcro and slowly and gently set the tiles in place one at a time, starting at one end of the tile and then working my way to the other. This allowed me to make minor adjustments when necessary. Once I was satisfied with the positioning of the sheet I would gently push down to make sure the adhesive stuck to the shadow box and then moved on to the next sheet until all of the sheets were in place.
How Many Flowers?
We had several things to consider when deciding what flower(s) to use to make the flag:
- They had to be red and white
- They had to be cost effective as we weren’t on an unlimited budget
- They needed to hold up for the event
- They needed to be easy to work with
- We needed to be able to produce clean lines between the red and white, even in the corners and stem of the maple leaf.
There were not a lot of options that could fit the bill so we went with the obvious; the unfairly maligned carnation. By using both standard and miniature carnations we knew that they met all of our criteria. But how many would it take to cover an area of 1152 square inches?
We knew that an eight in foam ball requires 120 carnations to cover the surface. But we were working with a flat plane and not a sphere so how to translate that? Back to match class! A sphere has a surface area is calculated as 4 x pi x the radius squared. So an eight in foam ball has a surface area of approximately 201 square inches (4 x 3.14 x 16 = 200.96). But the carnations are not flat on the foam ball; they stick up from it, maybe about an inch on all sides of the sphere. Using three quarters of an inch to be conservative the radius becomes 4.75 inches ((8 + .75 + .75)/2). This results in a surface area for the carnations of 284 square inches (4 x 3.14 x 22.56 = 283.4). So dividing 284 square inches by 120 carnations, each carnation has a surface area of 2.37 square inches.
Using this as a rough calculation, we would need 486 standard carnations to cover an area of 1152 square inches (1152 / 2.37 = 486). That gave us a starting point. In order to cover 24 inches by 48 inches we would need twice as many carnations to cover the width as we would the height of the flag since it is twice as wide as it is tall. To figure out how many we need to create one vertical row of carnations, we need to know the dimensions of a carnation. Skipping the math, a conservative estimate of a carnation’s height is one and one-half inches (approximately the square root of 2.37 square inches). To make column of carnations 24 inches high we need 16 carnations (24 / 1.5 = 16). If we need twice as many carnations to cover the width as we do they height, that will take 32 carnations. 16 carnations tall by 32 carnations wide gives us 512 carnations total.
The Canadian flag is essentially two equal strips of red with a square of white in the middle. In a two foot by four foot flag, the red stripes would be one foot wide and the white square would be two feet by two feet. So each one foot wide red stripe will need 16 carnations tall and 8 carnations wide for a total of 128 carnations for each stripe; 256 total.
The white square in the middle is 24 inches wide by 24 inches tall or 576 square inches. However, it is partially taken up by the red maple leaf in the center. We estimated that the maple leaf took up one-third of the white square leaving 386 square inches (576 x 67% = 385.9). In order to get detailed lines next to the maple leaf we chose to use white miniature carnations. We estimated that they would take up 20% of the area covered in white, or 77 square inches (386 x 20% = 77.2). Miniature carnations are approximately one square inch so we figured we could cover the area with two 10 stem bunches; assuming four blooms per stem but we bought three bunches to give us a little margin. That left us with 309 square inches of white to cover with standard carnations for a total of 130 carnations. Since they are sold in 200 stem cases, we ordered 8 bunches to give us a cushion.
We estimated that the maple leaf covered one third of the two foot square field of white, or 190 square inches which we rounded up to 200 (24 x 24 x 33% = 190). We planned on using red miniature carnations to get the detail in the corners of the leaf and in the stem, which we estimated was 20% of the total maple leaf area or 40 square inches (200 x 20% = 40). Assuming blooms per stem or 40 stems per bunch but we bought three bunches to be safe. That left us with 160 square inches to cover with standard carnations (200 – 40 = 160) which would require 68 stems (160 / 2.37 sq in = 67.5).
Adding the 256 carnations for the red stripes and 68 carnations for the maple leaf gave us a total of 324 carnations. To be safe, we ordered two cases of red carnations so that we would have a wide margin for error.
Our total flower buy:
Red carnations 400 stems
White carnations 200 stems
Red miniature carnations 30 stems
White miniature carnations 80 stems
Did we have much left over? Not as much as we would have predicted, but we did use some for display and we gave many of them away. What was important to us was that it was perfect and that our budget factored in buying the extra flowers as a cushion.
Preparing for Show Time
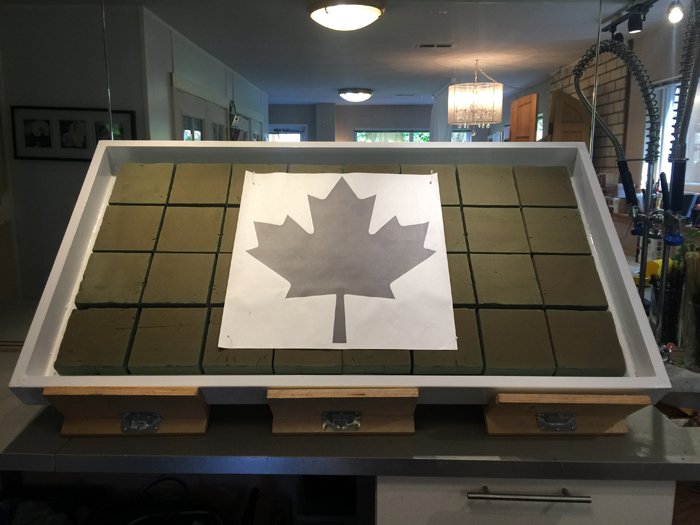
We worked with our local FedEx Office to enlarge the white portion of the Canadian Flag to two feet tall to match the dimensions of the flag that we were creating. They printed it out in black and white and we cut out the maple leaf and pinned it into the center of the floral foam tiles. We then carefully traced around it with a floral knife to give us an outline of the maple leaf etched into the foam.
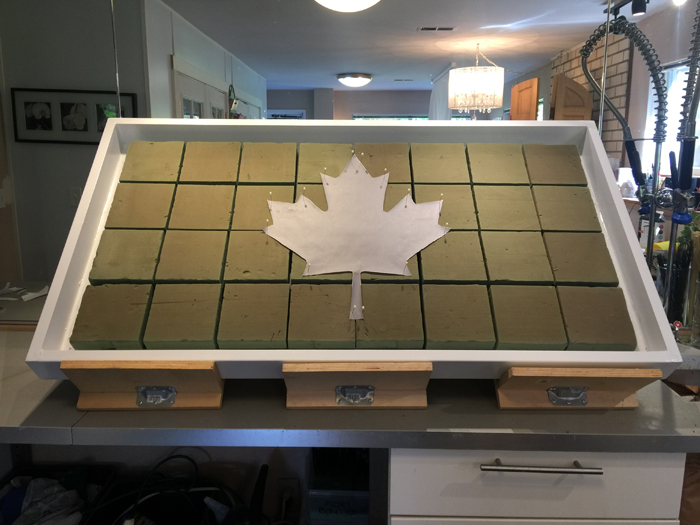
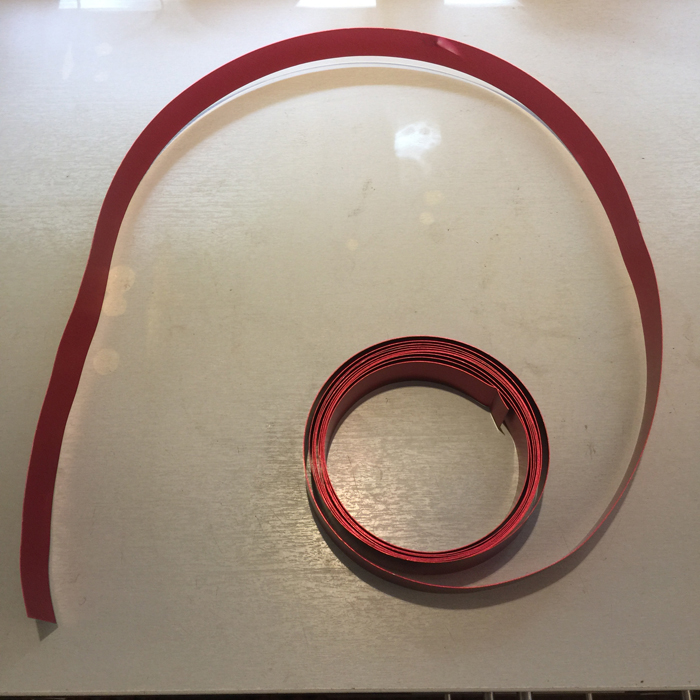
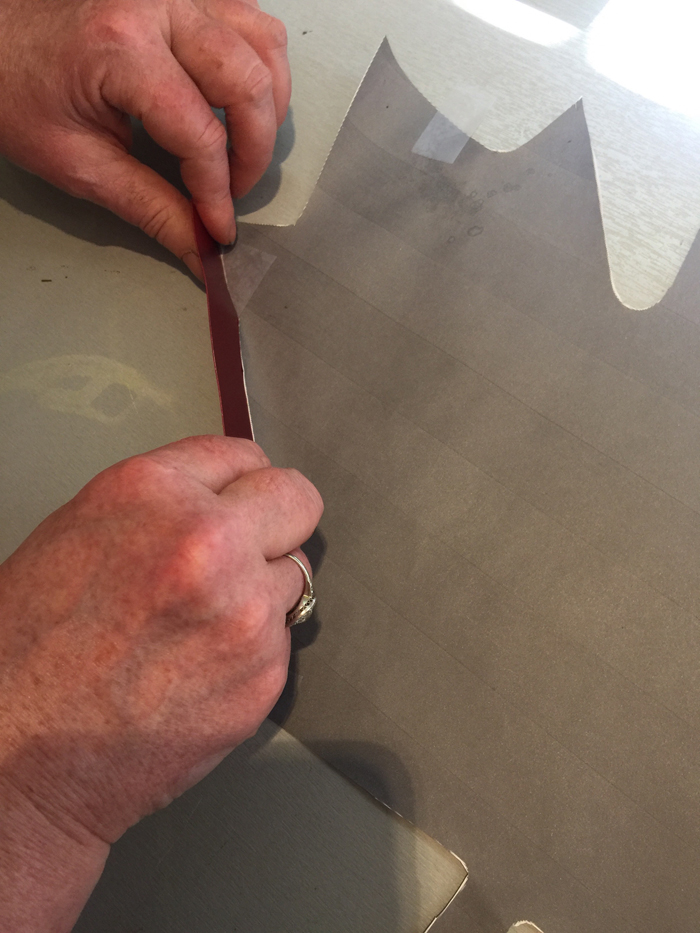
The maple leaf in the Canadian flag has eleven points on it and a narrow stem at the bottom. The points of the leaf and stem could be really tricky to create a clean division between adjacent red and white carnations. To achieve clean lines we used one inch Oasis flat wire in red to keep the red and white flowers separated. To determine the length and shape of the wire pieces that we needed, we used the maple leaf outline that we had used to trace the pattern onto the floral foam. We laid out sections of wire from one point of the maple leaf to an adjacent point and cut the flat wire to match. We then gently pushed the flat wire into the tracing of the maple leaf on the floral foam just enough for it to hold in place. We also used 24 inch long pieces of flat wire along the edges of the red stripes to keep the stripes crisp and even.


Foam tile sheets would usually be soaked prior to being attached to a backing. We made the decision not to soak them for several reasons. Each sheet would weigh 15 pounds when wet adding a total of 40 pounds to the flower wall during transportation. The venue is a classic hotel in Downtown Seattle and doesn’t have direct elevator access to the room we were working in so this extra weight would also need to be carried up a small staircase. Floral foam can drip leaving a trail of water from the loading dock, in the elevator and all the way to the room, as well as green streaks on the freshly painted shadow box. Inserting flowers into the floral foam would displace water, causing it to drip and potentially end up on the floor of the venue. At the end of the evening we needed to transport the flower wall back out of the room and to the studio because we couldn’t leave it at the venue. Finally, the flower wall needed to look good only for the three hours of the event which offset any benefit to be gained from soaking the tiles. To make inserting the flowers easier, we choose to spray the floral foam with water instead.
We wrapped the flower wall and shadow box in a large moving blanket to minimize the chance of scratching the paint during transportation. We used bungee cords to hold it upright inside our delivery van leaving the floor free for all of the other elements that we were bringing with us to the event.
Show Time!
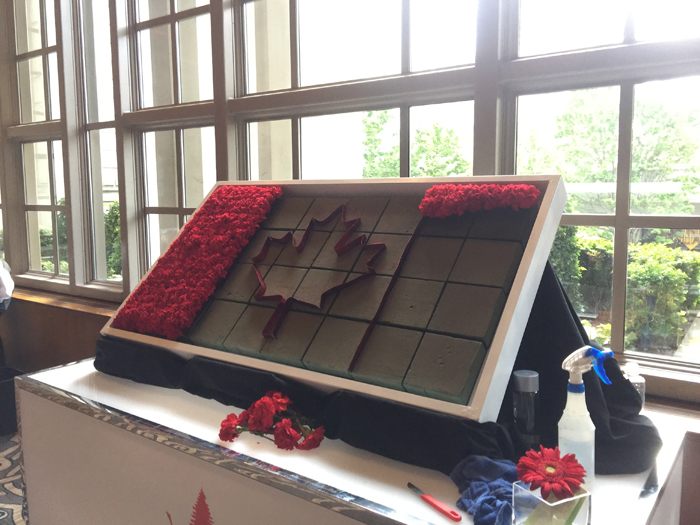
The shadow box rested on three inclined frames that we use when decorating holiday wreaths. This angle made it easy to see the flower wall as it was being made from across the room so that it would draw attention as well as putting it at an angle that made it easy to work on. Although not ugly, the frames are functional as opposed to pretty with the mechanics holding them together clearly visible. We covered them with a large, black, fabric background that we use for photo shoots. The table that it was set on was 40 inches tall, making it the perfect height for Leigh, my creative director, to work on since she is above average height.

Along with creating the Canadian flag flower wall, we were also creating and handing out hand-tied bouquets of red and white flowers wrapped in coordinating tissue paper and a collar that had the maple leaf flag logo of the event. The bouquets were made with gerbera daisies grown by Hollandia in British Columbia, adding another connection to the Canadian theme for the event. Our goal was to give away 70 bouquets in three hours from a vintage flower cart that was rented for the event.
Preparation is key to having two simultaneous activities go smoothly. We knew that three hours would not enough time to make all of the bouquets on-site. Half of the hand-tied bouquets were premade and pre-wrapped with water tubes on the flower stems. The remaining flowers were put in galvanized buckets giving the flower cart a farmer’s market vibe. As much preparation as possible was done before the event including: filling 500 water tubes to put on the flowers; creating a stack of tissue paper that alternated between red and white paper to make wrapping easier and to save on space; precutting cellophane to be used to wrap the bouquets; making a collar of the specialty paper for the event to use in wrapping; and precutting the ribbon that would hold the wrapping together. This helped speed up the process of creating bouquets throughout the evening. We began the evening with a full display of flowers and greens in the galvanized buckets and worked from backstock until we ran out after the first two hours.
We ordered the carnations in advance and left them out of the cooler so that they would open fully and cover as much space as possible. A few hours before the event we cut the stems of the standard carnations down so they were 6 inches long and put them into rectangular buckets. Wet towels were laid across the top to help prevent dehydration. One bunch of red and one bunch of white carnations were set aside to be used in the flower cart display. They would serve as extras if needed in the creation of the flower wall. Shortening the stems minimized the amount of waste greenery that we would need to dispose of as we worked, keeping the workspace tidy since we were part of the entertainment. It also made transporting the flowers to the event easier. As they were cut during the event, the stems were placed into a galvanized pail that matched the buckets used for the flower cart display. We covered a brown paper yard-waste bag with leftover paper that was printed with the event logo to make it more discreet and emptied the galvanized waste pail into it as it filled up.
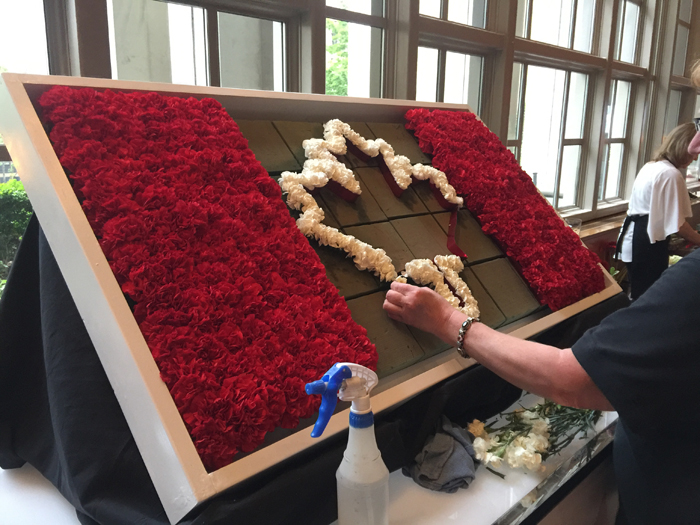
We knew that the majority of the event guests would arrive a while after the event started. Since the detailing of the maple leaf was going to be the most dramatic part of creating the flower wall, Leigh began with filling in the red stripes on the sides of the flag. She sprayed a section of the floral foam with water from a spray bottle in preparation. To save time, she would cut a handful of the standard carnations at one time. Flowers were added to the top row of one red stripe working from the flat wire toward the edge of the flag. This allowed her to make sure that she was using the eight carnations that had been planned for each row of the stripe and to make adjustments if she found that our calculations had been off. Thankfully our detailed planning paid off and we ended up using exactly the planned number in both of the stripes, 16 rows with 8 carnations in each row.
Once the left stripe of red was completed, Leigh repeated the same procedure on the right stripe, this time working from the flat wire on the left towards the edge of the flag on the right. We had planned in advance to place the carnations slightly closer to the edge of the floral foam to give more coverage of the mechanics beneath them. In addition to that, all of the carnations along the outer edge of the flag were placed at a slight angle pointing toward the shadow box frame to further hide the floral foam.
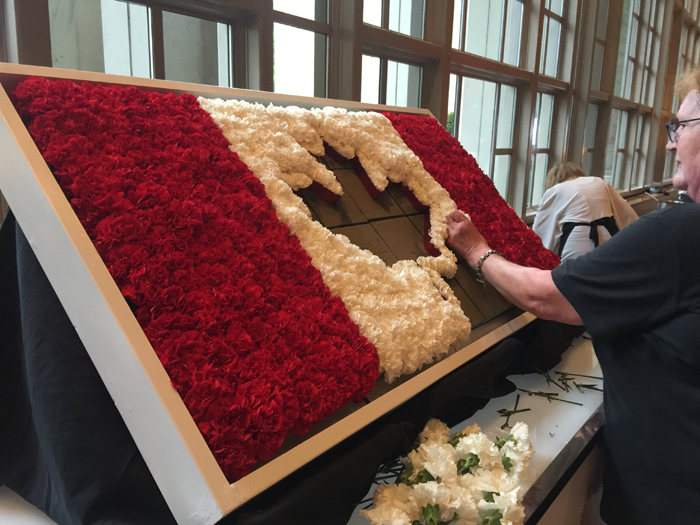
Once the two red stripes were finished, work began on the central white square. We wanted very clean lines between the red and the white carnations. In addition to outlining the maple leaf with one inch flat wire, we used miniature carnations along the flat to make sure that the details were as crisp as possible. Leigh worked her way around the perimeter of the maple leaf covering all of the exterior edge with white miniature carnations. Once this was done, she started at the top left corner of the field of white and placed standard carnations across the top row, repeating the slight angle toward the shadow box frame to ensure the floral foam was hidden. She then continued to work from left to right ending where the white miniature carnations that outlined the maple leaf were placed. Wherever the standard carnations did not provide complete coverage due to the angles created by the leaf, additional miniature carnations were used to fill in. Once the left side of the maple leaf was filled in, she repeated the process on the right side, but in reverse until the entire field of white was covered.
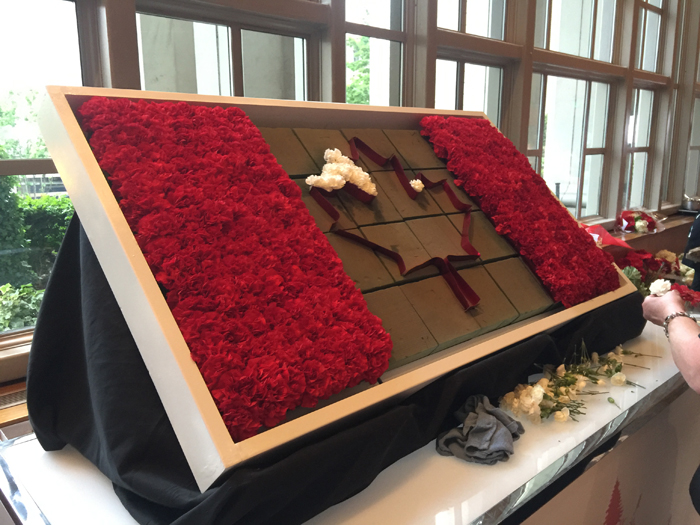
Miniature red carnations were used to fill in the outer edge of the maple leaf and the stem using the flat wire as a guide. This created a fairly clean line that allowed all eleven points of the maple leaf to show. More standard red carnations were used to fill in the remaining space with red miniature carnations filling in any remaining gaps in coverage.
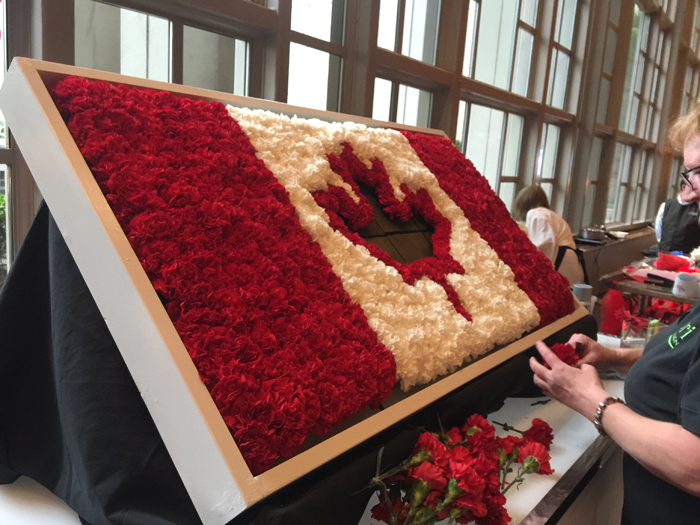
Guests enjoyed watching the flower wall being created. Many asked questions as Leigh worked on it. It gave us an opportunity to talk about Fiori Floral Design and connect with new customers. Once the flower wall was finished, guests lined up to take pictures with it. Creating the flower wall added an experience to an event that was otherwise focused on Canadian specialty foods and drinks; which added a special touch to the event that guests had not experienced before.


One Response